I decided to get some herbs and lettuce growing inside to ride out the winter.
I decided to go with a deep water culture setup since I have had success with that in the past with lettuces. This time around though, since I am growing in a loft that is accessible by ladder only, I wanted to make the nutrient reservoir as small as possible. So I think I have done that by choosing to grow each plant out of a yogurt containers, that have been outfitted to accommodate net pots and air tubing (for oxygen).
I am a bit unsure about doing this, since I tried growing thyme out of a yogurt container last summer and it didn't go well. However, I think one of the main reasons it didn't work out was that the container was sitting in a bay window, with direct sunlight heating up the nutrient solution. And with less than a liter of solution, that heats up pretty quickly. Another issue over time was evaporation. This time around I'm planning to control temperatures by having all the yogurt containers themselves sitting in a large tub filled with water that I will add ice packs to when needed. So the tub water will function to cool off the nutrient solution in the yogurt containers. This is better for me too because I plan to regularly change out the solutions and it would be ridiculous to change out a 10 gallon reservoir via a ladder! We shall see.
So my first three lettuce seedling emerged 12/1/13 and this is them one day later:

They seem a bit thin? I'm going to move them tomorrow morning from near a sunny window to under their own 60 watt cfl light where they'll eventually be in their nutrient solution setup.
----------------------------------------------------------------------------------------------------------------------------
Here are the three lettuce seedlings under the grow light in their setup.
 |
| Here they are. I have them sitting on top of a small dish tub and some Styrofoam for now just to get them closer to the light. |
 |
| Again, and you can see the light setup. It is a rounded piece of metal with a double light socket attached in the middle. It hangs from ceiling with chains. I took the design from this YouTube video by SleestaksRule. |
 |
I'm using black and white plastic for the walls of the grow spot. It works out nicely.
|
----------------------------------------------------------------------------------------------------------------------------
 |
| Lettuces - 4 days after germination. |
To be continued...
----------------------------------------------------------------------------------------------------------------------------
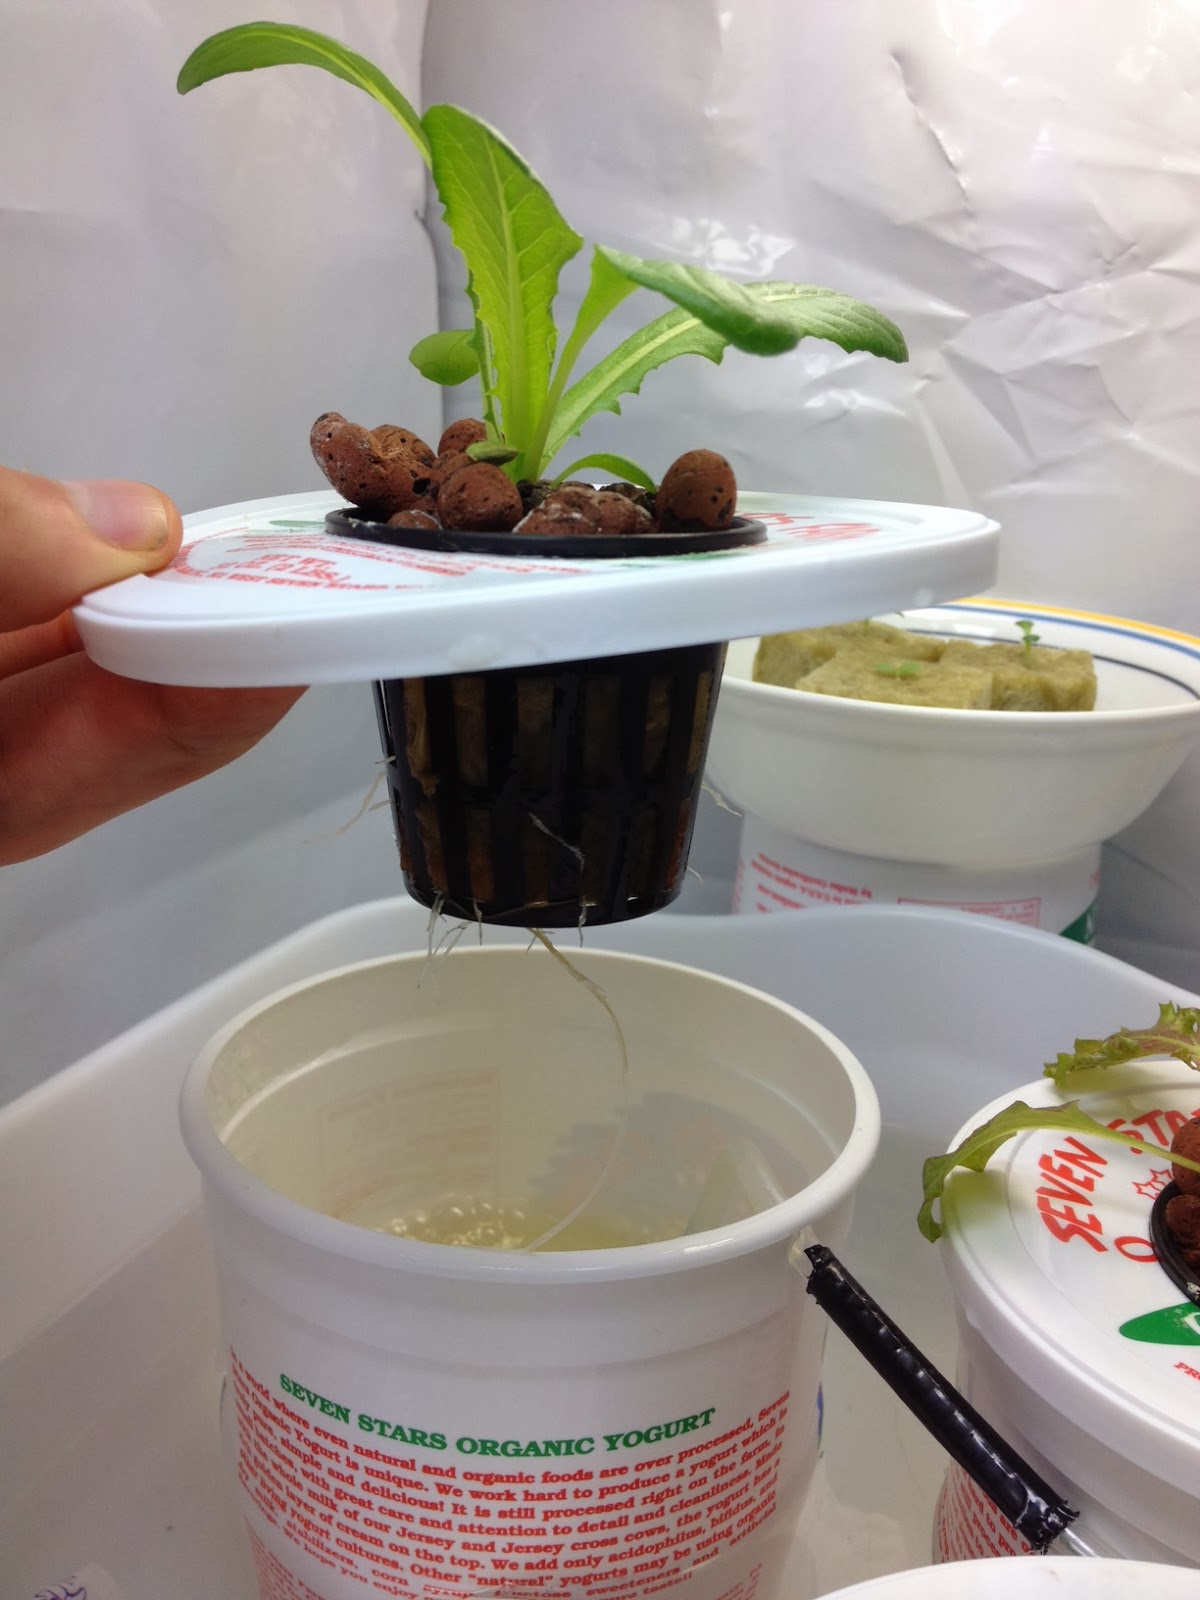
Here is a picture of the plants in their yogurt container setups from 12.13.13:
 |
| Bam! Yess, finally in their own homes. The one closest to me is the experimental plant. That one has no air stone pumping its solution full of oxygen. |
These are almost two weeks after emergence. They are looking pretty good so far, I've been keeping the solution in the tub pretty cool with the ice packs. I really should get a thermometer soon to know what the actual temperature is. Just going on feel I would say it fluctuates between 50 and 70, after the ice pack melts. It's not a bad system though, in the morning when the ice pack is all melted, I just switch it out with one in the freezer and then put that one in the freezer for the next morning.
I mixed the yogurt containers up with the lowest dose of my General Hydroponics MaxiGro nutrients. I plan to up the concentration with the first nutrient change I will do once the roots grow down through the net pots into solution.
I have one of the plants growing Kratky style, with no air stone in its reservoir. I did this for a couple reasons. One, I only had two small pumps and didn't want to turn on larger 8 spot pump for these three lettuces just yet. Another was that I was curious how vital the air will be the these plants. Over the past summer I successfully grew lettuce utilizing the Kratky method outdoors where I roughly mixed one batch of nutrients for the plants, threw them in and forgot about them. Even in the summer sun, which must have been heating that solution to undesirable temps, they grew to maturity quickly and tasted great! I know there are plenty of people out there using the Kratky method to grow lettuce so I just wanted to give this a shot.
 |
| The two small blue pumps are the ones I'm using for these. They are Tetra Whisper Air Pumps, 10 Gallon. They're very cheap, something like $6 at Walmart. |
 |
| This is the timer I use for now. I have the lights and pump come on for 14 hours a day (which I just changed from 11, since I didn't realize it was only at 11). |
 | ||||||||||||||||||||
This is the nutrient solution I am using by General Hydroponics. It comes as a powder that you simply mix into some water, and then pH adjust the solution.
Now here is a picture of the plants from today, 12.17.13:
I'm not sure how to explain this difference in the active vs. passive containers. I don't think it's from the tiny amount of light that could be coming int (from the tube being inserted into the top of the container for the air). If you know why or have any ideas, please let me know!
See the continuation of these plants at Indoor Hydroponic Lettuce in a Small Space (Yogurt Containers System) Part 2 |


No comments:
Post a Comment