Monday, December 30, 2013

Indoor Hydroponic Lettuce in a Small Space (Yogurt Containers System) Part 2


This is a spill-over post to the first part of growing hydroponic lettuce indoors using yogurt containers.

I have two sets of lettuces going (three in each set). The first set I left one plant to grow passively and did not aerate its reservoir. Instead the plant's roots have grow down into solution and it will get oxygen through its upper roots that are exposed to air. Unfortunately, that plant doesn't seem to be doing very well. 

Here is an update of the plants on their second nutrient change:


All the plants, as of 12/29/13

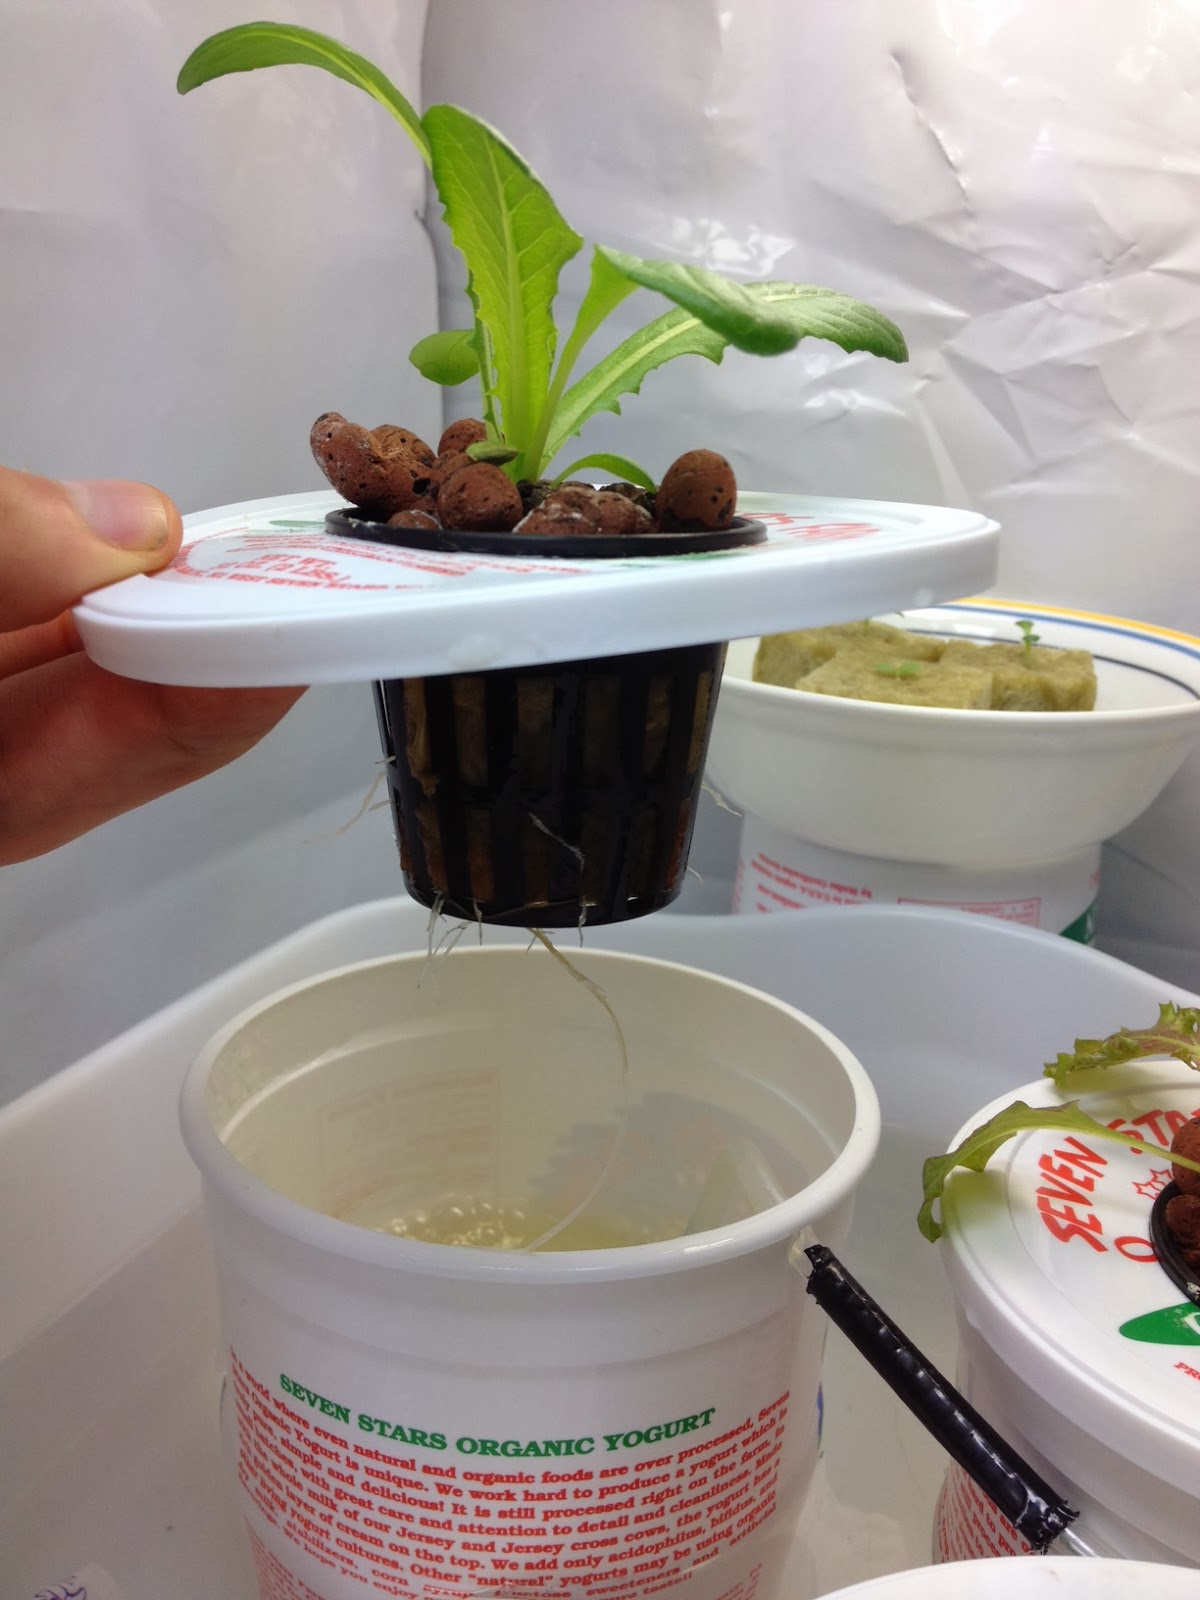
This is one of the aerated plants

This is the other aerated plant.


Here is the passive one


Here are some new plants I'm starting. They are almost 2 weeks.

The plants seem to be looking good.The root systems are nice and white and long. They aren't growing as fast as I had hoped but that isn't really a surprise. There are multiple reasons why they may be slow to mature.

The lights (60w and 32w CFLs) are probably not as strong as they could be. I may not have been upping the nutrients as fast as I could have (having no TDS meter). Also, there are other nutrients I could have added besides the GH MaxiGro nutrients. The temperatures stay constant via ice packs that are switched out of the bin (the water that the reservoirs are in) daily. The pH is tested with every nutrient change.

It seems like the most likely limiting factors are light and nutrients/timing of nutrients.

I hope that the lettuces will fill out eventually, maybe they'll just take a bit longer to do so. It is only 30 days after all, most lettuces are 45-55 days to maturity.

The yogurt containers are working out well from the standpoint of changing the nutrients though. That was my whole reason for making this system, because I am growing in a space accessible via ladder only and didn't want to have changing the reservoirs be a huge to-do (because then, it just wouldn't get done :  D ).

----------------------------------------------------------------------------------------------------------------------------

UPDATE:12.31.13

I looked at the plants today, growth is pretty much the same it has been. But then roots look a bit odd:

Mold on the roots or just root hairs?


I'm not sure yet whether this is mold or not, but I'm leaning toward mold since there are other lettuce roots which are just white and healthy looking without the tiny white fuzziness. It makes sense since there isn't a whole lot of air exchange/flow from the inside of the yogurt container where the roots are to outside it. The air would have to come up and out through the net pot, which already has the rockwool and hydroton rocks in it. Another thing is that the loft space where the whole setup sits doesn't get the best air exchange either. This will have to be modified in future grows.


----------------------------------------------------------------------------------------------------------------------------

UPDATE:1.4.13

So I changed the nutrients in the inital batch of lettuce for the third time, almost to full strength. In the days after that nutrient change, the plants began to droop a bit and overall just didn't seem very happy. 

Here are some pictures from of the roots:


They look terrible! The roots, which were beautiful and white now look lifeless and brown. I'm not sure why this happened. The nutrient change wasn't a huge increase in nutrient and they had a good amount of time before upping it. I also added some hydrogen peroxide to the new nutrient solutions. Maybe the mold has something to do with it? 


----------------------------------------------------------------------------------------------------------------------------

UPDATE:1.10.13

So I've been busy lately and actually didn't get a chance to look at the plants in a couple days or change out the ice-packs. I figured they were on their way out, after seeing the roots turn brown. But when I went up to look at them today their growth was huge! I was impressed. 

Then looking at the roots I was in for an even bigger surprise....

There are tons of white healthy roots shooting through the net pot!

This one too! You can see the dark older roots still hanging there and then the fresh white roots coming through.

Picture of how big they've gotten. Note the failed passive plant in the lower right/

Here are the second crop, they are coming along well.
I didn't expect the plants to make a comeback like that, but it looks like they did! I guess they just needed time to get through whatever made the roots do that. It's good to know that plants can be so adaptable and responsive like this! I will do one last nutrient change and then after that likely harvest them.

Sunday, December 29, 2013

How I Increase Hydroponic Nutrient Concentrations (WITHOUT an EC/TDS Meter)

Eventually I will get an EC meter, but for now, I just give the plants the minimum and slowly build upward.

Nutrient concentrations have always been the toughest part of hydroponics for me. While I don't have it 100% figured out, I will write about how I do things. 

What I have been using for lettuce is General Hydroponics MaxiGro. On the package, it says to feed the plants a concentration of 5-10 grams per 4 liters. For my yogurt container system, the fill level to the bottom of each net pot is 600 milliliters (or 0.6 liters). So each of my "reservoirs" is 0.6 liters. So to start them out with the minimum level of 5 grams per 4 liters, I need to know how many grams go into 0.6 L to achieve that same concentration.

You want to setup an proportion with an unknown (how many grams per 0.6 L). Here is a good tutorial on proportions if you need a refresher. Here is what I did:


So I started my plants off at the minimum, because as you probably know, you don't want to overload your plants with too much nutrient. But the question remains: how soon should you increase the concentration?

It's a shame the plants can't talk and just tell you when they're wanting more food. What I've done is just experiment with when to increase the nutrient. I started a batch of lettuce with the minimum and then tried upping the concentration from the minumum (5g/4L) to 7g/4L. It works for the yogurt containers system because it is very convenient and quick to change out a 600 mL reservoir. Recently I went from the minimum concentration to a 7g/4L concentration 5 days after being in the minimum concentration (ten days after of the seeds emerged).

Maybe soon I will get an EC/PPM meter and will be able to more accurately gauge when the plants need more nutrients. Until then, this method seems to be working out just fine.

Thursday, December 19, 2013

Using Google Calendar for Gardeners to Record Plants' Growth and Development

Woman confused
Sometimes keeping track of changes in all your plants can seem overwhelming.

Tracking Your Plants

This post is for those who are just getting started and are thinking about how they will monitor their plants, record when they emerged, and how they will remember to change the solution for different plantings. I don't claim to be an expert by any stretch, but I do have a system of documenting my plants' activities that I believe is very helpful to the home gardener (and maybe for commercial growing too).

Early on, I had a notebook that I wrote everything down in. For example, I wrote the date of when I started four tomato plants so I would know how many days it had been since planting them. Then when they emerged, I would write that date down. Once I started having many different plantings I would try and label them "Tomatoes 1" or something like that so I would know which planting of tomatoes I was referring to. If you're planting new a crop every two weeks or so and have many different vegetables growing, things can get confusing quick!

What I've done now is put everything on Google Calendar which has been working out very well so far. It's definitely not perfected so if anyone reading this has any ideas for tweaking things, please let me know!

A screenshot of my Google Calendar, month-view, of December 2013:


Note I only have a couple of things going on in this calendar.

How I Use Google Calendar


I use Google Calendar mostly as a way to look back and see what my plants did, what I did to my plants, and when it all happened. I use it more as an after-the-fact method of jotting down things that occurred (e.g. transplanted lettuces into hydroponic system, seedlings' roots poked through bottom of rockwool). Sometimes it has more of a planning function, informing me of future dates to start new crops, or when to change out a nutrient solution.

What I do is give each group of plantings a unique ID (name), like 'N1' on the calendar above. The IDs correspond to the month in which the seeds were started and the order in which they were started. For example, N1, means that that particular group of plants were the first seeds that I started in the month of November (N2 would be the second group of plants started in November). I then make sure to use that same N1 identification to refer to those plants in future updates.

I also made up special abbreviations for each month so they are never confused:

J = January
F = February
M = March
A = April
MY= May
J = June
JY = July
AG = August
S = September
O = October
N = November
D = December

Feel free to make up different abbreviations or do things however you'd like, this is just what I came up with.

Another thing I do is make different calendars for different types of plants (e.g. Hydroponic and Soil). This is nice because it allows you to turn on and off the different calendars as you look back at things (which can come in handy when your dealing with many different plantings). It allows you to be dealing with say N1, look back and say "Okay, these guys emerged 4 weeks ago, they should be ready to harvest in two more weeks." Each calendar also can have its own color, which is nice when displaying all events.

What would be cool is if you could attach pictures to each of those events, which I believe might be available in the Google Labs options for Calendar. I'll keep you posted.

Events to Record

For dealing with hydroponics, I will naturally record the date when I start the seeds first. If I start 3 lettuce plants in rockwool cubes on January 1st, that group of plants becomes J1. For the actual calendar entry, I will always start with the ID and then specify what kind of event occurred. I have abbreviations for the most common sorts of events. For a seed starting on January 1st my calendar entry would be something like "J1 SS."

Here are some abbreviations I began to use for common occurances:

SS = seeds started
SE = seeds emerged
TP = transplanted

You can really make up whatever works for you, or just write out exactly what you did for each event. This is just how I do things.


A screenshot of my event entry for changing nutrient solution:

Here is my entry for when I change the nutrient solution for my N1 plantings (note this is the N1 planting under the "hydroponic" calendar, so there is no confusion with possible outdoor lettuce crops). 

I'm sure there are plenty other methods out there

I hope you enjoyed reading about how I record my plants' progress. Doing things electronically like this has been working well for me, maybe since I use Google for my regular calendar needs anyway. Feel free to ask me more about my method.

If you have any tweaks, feedback or another system I could learn from please tell me. 

I wish you and your garden well!

Monday, December 2, 2013

Indoor Hydroponic Lettuce in a Small Space (Yogurt Containers System) Part 1

I decided to get some herbs and lettuce growing inside to ride out the winter.


I'm going to go with lettuce and herbs because I already have the right lighting and nutrients for the growth phase of those plants, which is all I really need for them. I would need to buy different lights and nutrients to grow plants that need to flower.

I decided to go with a deep water culture setup since I have had success with that in the past with lettuces. This time around though, since I am growing in a loft that is accessible by ladder only, I wanted to make the nutrient reservoir as small as possible. So I think I have done that by choosing to grow each plant out of a yogurt containers, that have been outfitted to accommodate net pots and air tubing (for oxygen). 

I am a bit unsure about doing this, since I tried growing thyme out of a yogurt container last summer and it didn't go well. However, I think one of the main reasons it didn't work out was that the container was sitting in a bay window, with direct sunlight heating up the nutrient solution. And with less than a liter of solution, that heats up pretty quickly. Another issue over time was evaporation. This time around I'm planning to control temperatures by having all the yogurt containers themselves sitting in a large tub filled with water that I will add ice packs to when needed. So the tub water will function to cool off the nutrient solution in the yogurt containers. This is better for me too because I plan to regularly change out the solutions and it would be ridiculous to change out a 10 gallon reservoir via a ladder! We shall see.


So my first three lettuce seedling emerged 12/1/13 and this is them one day later:


They seem a bit thin? I'm going to move them tomorrow morning from near a sunny window to under their own 60 watt cfl light where they'll eventually be in their nutrient solution setup.


----------------------------------------------------------------------------------------------------------------------------

UPDATE:12.5.13

Here are the three lettuce seedlings under the grow light in their setup.

Here they are. I have them sitting on top of a small dish tub and some Styrofoam for now just to get them closer to the light.

Again, and you can see the light setup. It is a rounded piece of metal with a double light socket attached in the middle. It hangs from ceiling with chains. I took the design from this YouTube video by SleestaksRule.


I'm using black and white plastic for the walls of the grow spot. It works out nicely.

----------------------------------------------------------------------------------------------------------------------------

UPDATE: 12.6.13

Lettuces - 4 days after germination.


To be continued...


----------------------------------------------------------------------------------------------------------------------------


UPDATE: 12.17.13

Here is a picture of the plants in their yogurt container setups from 12.13.13:

Bam! Yess, finally in their own homes. The one closest to me is the experimental plant. That one has no air stone pumping its solution full of oxygen.

These are almost two weeks after emergence. They are looking pretty good so far, I've been keeping the solution in the tub pretty cool with the ice packs. I really should get a thermometer soon to know what the actual temperature is. Just going on feel I would say it fluctuates between 50 and 70, after the ice pack melts. It's not a bad system though, in the morning when the ice pack is all melted, I just switch it out with one in the freezer and then put that one in the freezer for the next morning.

I mixed the yogurt containers up with the lowest dose of my General Hydroponics MaxiGro nutrients. I plan to up the concentration with the first nutrient change I will do once the roots grow down through the net pots into solution. 

I have one of the plants growing Kratky style, with no air stone in its reservoir. I did this for a couple reasons. One, I only had two small pumps and didn't want to turn on larger 8 spot pump for these three lettuces just yet. Another was that I was curious how vital the air will be the these plants. Over the past summer I successfully grew lettuce utilizing the Kratky method outdoors where I roughly mixed one batch of nutrients for the plants, threw them in and forgot about them. Even in the summer sun, which must have been heating that solution to undesirable temps, they grew to maturity quickly and tasted great! I know there are plenty of people out there using the Kratky method to grow lettuce so I just wanted to give this a shot.

The two small blue pumps are the ones I'm using for these. They are Tetra Whisper Air Pumps, 10 Gallon.  They're very cheap, something like $6 at Walmart.
This is the timer I use for now. I have the lights and pump come on for 14 hours a day (which I just changed from 11, since I didn't realize it was only at 11).
This is the nutrient solution I am using by General Hydroponics. It comes as a powder that you simply mix into some water, and then pH adjust the solution.


Now here is a picture of the plants from today, 12.17.13:
Notice the plant closest to me (the experimental one without the airstone). It seems to be keeping up just fine with the other two! I'm not sure yet if it is the same variety as the one on the right. If it is it may be a tad behind in growth, but the leaves look different from the plant on the right. We'll see in due time.


----------------------------------------------------------------------------------------------------------------------------

UPDATE: 12.19.13


 I started a new set of lettuces on 12.15, about 15 days since I started the initial ones. I'm shooting for a continuous harvest as long as all goes well. Here are a couple pictures of the new ones:
Note the new seedlings in the bowl. This picture was taken right after I moved them up there on 12.18


This is them today, 12.19, they came right up!


----------------------------------------------------------------------------------------------------------------------------


UPDATE: 12.22.13

How Active vs. Passive Plants and Roots are Faring (so far)


I checked on my plants today and was please that they are looking very nice and healthy! I specifically noticed my passive lettuce and compared its growth and appearance to the active (aerated containers). Firstly, here is a picture of everyone:

The passive guy is closest to the camera here. I'm pretty sure the aerated ones are outpacing him for right now.

The leaves of the passive lettuce are a lot thinner feeling and not as substantial as the other two. Unfortunately, I don't think the passive one is the same plant as the one in the background. The seed packet I used was a mix and so it looks like I have three different plants.

Then I took a look at the roots. This confirmed further that the passive guy is being beat out by his better-aerated cousins. Check out these pictures:


Roots of active plant #1
Roots of active plant #2
Tiny roots of passive plant : (
I suppose this plant may catch up eventually or it may just be limited because of lack of oxygen. We'll see soon enough. Here are the newest seedlings, they are almost ready to go into their own containers:


Looking fine!
One other thing I noticed (I first noticed it when I changed the solutions last week) is that the aerated containers are getting murky and the passive one isn't at all. When I changed out the solution, the aerated ones also felt slimy and the passive solution stayed its initial light green shade while the aerated solution is brownish.
Aerated (active) solution
Non-aerated (passive) solution
I'm not sure how to explain this difference in the active vs. passive containers. I don't think it's from the tiny amount of light that could be coming int (from the tube being inserted into the top of the container for the air). If you know why or have any ideas, please let me know!

See the continuation of these plants at Indoor Hydroponic Lettuce in a Small Space (Yogurt Containers System) Part 2