I decided I needed to expand my gardening space.
Raised beds are a solid option for backyard gardens.
For my raised beds, I decided to go with square-shaped ones to fit into certain spaces in my yard. So this post will be about how I constructed a square bed for free using materials I had lying around. You may or may not be able to achieve this based on whatever you have lying around! The design though, is very simple, fairly common, and can be easily modified to make rectangular beds of varying length.
How I built this raised bed:
 |
| The finished bed. While it may not win awards for style, I used all scrap wood that was lying around. You can use whatever kind of wood you like to make it more handsome. |
Things You'll Need:
Essentials
- a drill (a drill/driver makes it a bit easier to drive screws in, but I used my regular drill and it worked just fine)
- a saw (realistically you'll need some kind of powered saw, e.g., table saw, circular saw, etc.)
- screws (I used around 30 screws for this. They were 1 1/2 - 2 inch screws I had lying around. Depending on the thickness of wood you decide to use you may need longer ones)
- wood (to keep this as cheap as possible, I used scrap wood. I know some of the best, longest-lasting wood to use is cedar. Cedar was too pricey for me, but if you opt for it, it will certainly last).
- (4) 20 inch 2x2's
- Scrapwood (or nice store-bought hardwood)
- measuring tape (measure twice, cut once!)
- carpenter's square (for marking out the boards straight)
Optional
- pliers (to pull out out nails and things if using scrap)
- a helper (for company and also to help with steadying the walls while you screw them together. Having a helper isn't necessary as you can see in my video, but it does make it easier.)
 |
| Let's see...I've got all my essentials here. Okay, now we're ready to build this thing! |
Step 1: Measure, Mark, and Cut all your Wood
Mark out your 2x2's and cut them to your desired length.
NOTE: I made my raised bed a square 20 inches high and 2ft on all sides. You can make yours however you'd like, but for the rest of this tutorial I'll just assume you want to make it how I made mine.
The length of the 2x2's will be the height of the finished bed. I chose 20 inches since I wanted a fairly tall bed, and already had two 2x2's cut to 20 inches (why over-complicate things?). You may only need 1ft high beds; in that case cut your four 2x2s to 12 inches.
 |
| My four 2x2's, all cut to 20 inches. |
I knew I wanted my raised bed to be a 2ft square, so I cut all my boards to 2ft. Cut you boards to whatever you want your bed to be.
Also, using scrap wood of varying widths, I had to make sure I could fill up each 20 inch side with wood. Once you cut all your wood, make sure you have enough for your walls.
 |
| Be sure to use your square to mark out your cuts. |
Step 2: Assemble first wall
Attach your cut boards to two 2x2's to complete the first side.
You'll want to have your two 2x2's on the ground spaced about 2ft apart. Then line up your boards and start screwing them into place. I started at the top and worked my way down.
 |
| That's it, screw that wood on there! |
 |
| View of first side after finishing screwing boards in place. |
Step 3: Assemble Second Wall
Simply repeat step 2!
You should now have two walls that both look like the picture above. The next step is probably the toughest one, but is still pretty darn easy.
Step 4: Connect the two walls
You will effectively be building the third wall by connected the first two.
 |
| Third wall in progress. |
Step 5: Assemble the last wall
Finish out your raised bed by connecting your last wall.
 |
| Here I've just screwed in the last board on my raised bed (fourth wall is on top). |
Turn the bed and place it so you have a U shape with an open top. Now fill in that top with your remaining boards and screws. Yay! You now have a (basically) completed raised bed!
At this point you can take a good look at your structure, admire it, and evaluate whether or not you'd like to add anything. You could paint the outside however you'd like or simply leave it as it is.
Footnotes
As for mine, I opted to leave the wood as it is, but to reinforce one side (the old plywood side) with one more 2x2.
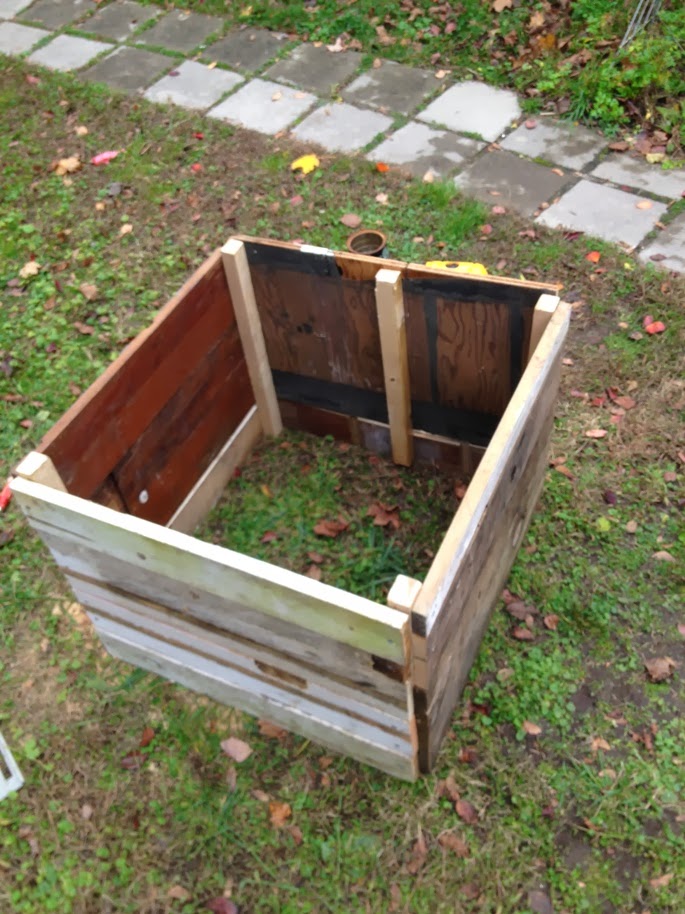 |
| Plywood reinforced, inside view. |
Above you can see what I did. That bottom piece of wood under the ply is actually very strong and solid, so I just used that as a base for the plywood and attached them with that extra 2x2. You probably won't need to do this if your using half-decent wood.
All my other sides are solid and the bed feels nice and sturdy, as your's should. I'm excited to test it out this spring!
If you have any questions or comments, please leave them in the comment field below. I hope this simple raised bed project works out for you just as as it did for me!
May your garden grow big and strong!
No comments:
Post a Comment